

As I've mentioned before,
this picture was the inspiration for the master bedroom remodel. I loved the way the stone looked and it's always the first thing I swoon over in pics of England and Europe. There has been many a time I wanted to grab a leather glove and old timey slap people who have drywalled over such history and character when someone like me who would maime for such luck can't find anything remotely like it. If there's one thing I know, I'm not down with re-inventing the wheel and putting up cement board to put real stone up. I don't need the real thing, I just need a reasonable facsimile. When I saw Cottage on Main Street used the lightweight panels from Barron Designs, I knew that was the solution for me getting to cuddle into my dream Cotswolds style bedroom every night. You can bet your sweet bippy I ordered those babies sooner than later since they could take 6-8 weeks to get in. Of course, it figures they were feeling quite productive and got them churned out in two weeks when we were nowhere near ready for them so in the basement they stayed for about two months.
When we took them out and were figuring out our pattern, I will tell you that the sample wasn't like the final product. I ordered three samples- two in the Dakota blend color I was pretty sure I wanted and one in limestone. Then I think two Hampton style and one of Carlton maybe? I chose the Hampton Dakota blend but when put next to the panels we were sent, they were almost a full inch thinner. It wasn't too big of an issue but I'd made some design choices around that sample that now needed adjusted which didn't make me happy so know that going in if you ever use them. I ordered the Dakota touch up paint kit and three tubes of Stone colored grout. The grout was pretty expensive so I had my own ideas on how I could make that stretch.
The biggest thing to know is that your walls are likely not square so that means finding level and snapping a chalk line or marking it somehow. Our situation was a little different because any instructions assume you are starting from the floor up from level there and we weren't. We needed a half wall so after trimming off the 'fingers' for a straight line to start on in the upper corner, we needed to mark the level line on the wall and go from that. I don't know if that's the right way to do it but that's how we did it and it worked well for our needs.
First we found and marked the studs which on this wall were 24" apart.
 |
| (Vertical tape is for studs/horizontal is where stud finder indicated wiring) |
The panels are light and when we put them up on the walls, checked to make sure they were level, lined them with construction adhesive:
...and made sure that at least two pre-marked studs were hit when screwing them in.
We rotated the patterns so they weren't side by side or on top of each other. The second row was going to be a little more tricky because they'd need to be cut about a foot down but ultimately, they were still easy to hang.
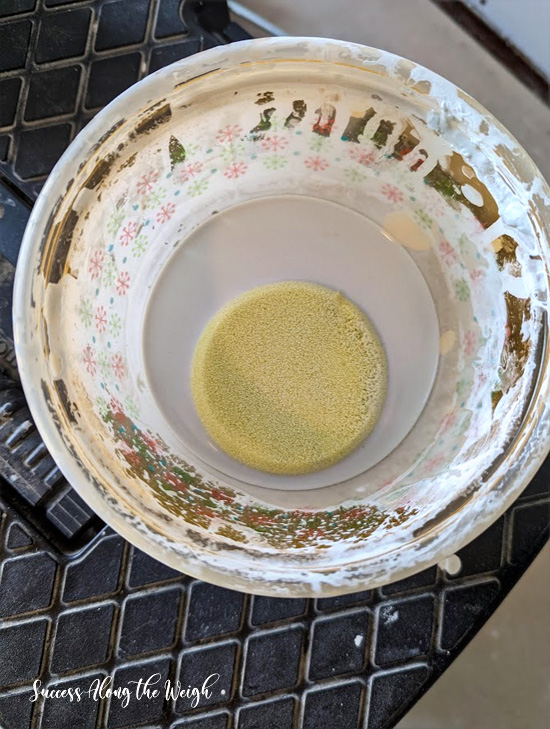
I will tell you that I am not one of those people who can unsee shading and contouring on products. This color scheme has some dark blue and maybe a maroon color kind of lightly sprayed on some stones and I did not care for it because they really jumped out at me. So I did some alterations of my own. I got some of the joint compound and watered it down quite a bit in a bowl.
Then I took a small sponge and wrung it almost all the way out and blotted all over the stones to lighten them. It kind of gave a lime wash look.
I didn't care for that alone so it was time to grab a lint free rag, my dark wax and my wax brush and see if I could age them a little.
I lightly dabbed the end of the brush into the wax, brushed it off onto one end of the rag and used the barely there wax to lightly graze against any texture on the top of the stone.
I took the other end of the rag and buffed the wax so it rubbed in and gave me the look I was going for.
It was actually kind of satisfying and meditative given everything else especially for me to get the nice mix of gray and brownish stone color I wanted and looked real, so we were quite happy with it.
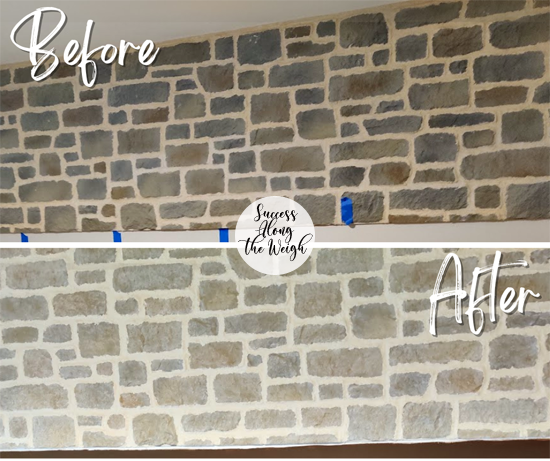
I wanted a little bit of an over grout look to the stones so I decided to backfill the pre-made grout lines.
*I'm gonna stop right here and not go through the bazillion trials and errors I went through to get what finally worked on this friggin' grout idea. Just know that, as usual, it was a process that had me almost chiseling everything out and starting over or taking a flame thrower to it more than once and calling it shou sugi ban to keep up with the latest trend. This process also included using "grout" that came from the company which is textured caulk. While it's a nice touch, the lightest color of "stone" dries to a beige-y pink cast and was not light enough and that was not going to work for me. I cannot count how many times I wanted to paint the whole thing white and move on. I saw someone did that and I recoiled in horror and thought "WHY would you cover that up!?" I get it now. I don't know if they had the same problems I did until I found my solution but I have had so many moments of utter defeat in this room I understand wanting to accept your fate and move on. Sadly, I'm stubborn and like a dog with a bone. Now, I'll skip to what I SHOULD'VE done and we'll pretend the thing in the grout bag is what I'm going to tell you because I was so over it at this point I didn't take pics with the product by the end but it doesn't change the process.*
I got some
lightweight spackle, chucked it in a grout bag and then it was time to frost dat beeotch.

I essentially filled the entire crack and smoothed it over the edges of the stone because what I had before made me cry because the valleys between the stones looked horrible to me and I was going for a European old stone wall look where over grouting is king. This stuff was truly my savior and it doesn't crack or shrink which is the big problem I had with the joint compound I originally used not once but twice. I wish I had found it sooner because it would've saved me a lot of frustration, a little cost and time which is why I'm telling you so you can learn from my mistakes should you make the decision to do something this nuts and if you do, you do so at your own risk if you follow any of this. The only thing is this is WHITE white. So if that isn't the color you want (I didn't) you can paint it. I already had Benjamin Moore's Tapestry Beige on hand from the walls and that toned it down perfectly to give the more faded grout color I wanted.
 |
| (Spackle on top, beige paint on bottom) |
It took me a few weeks to finish it because I had to move over to the board and batten project so we could move stuff around the room for the rest of this wall. Once the stone portion had been filled, grouted and painted, it was time to move on to the wood portion. It did not consist of slapping up wood. I did a lot of research and ordered a lot of samples of those peel and stick thin wood products out there. The colors were never right and certainly the price was more than I wanted to pay. For the amount of square footage we needed plus waste, it was going to be around $750 and I just couldn't especially since we overspent on the budget on all of the Retique It products for the board and batten. We looked at reclaimed barn wood which was even more expensive or if it wasn't, it was short squatty pieces in weird ass colors that weren't uniform and I didn't want that appearance. I wanted the appearance of old barn wood without paying old barn wood price. You dig?
I looked at a lot of tutorials,
some helpful, many not for what I wanted so I got a few pieces of equipment I knew we'd need to get that look.
Square Head Nails (for impressions)
Water Based Pre-Stain Wood Conditioner
Water Based Dark Walnut Stain
Water based polyurethane
Lint Free rags
Extras I shouldn't have needed but did because- me.
Retique It Black Walnut Stain (it was the wrong color they sent me and thank God I hung onto it)
I was terrified of this part because of the scale of it. I didn't want the perfect corners that were on the select pine boards we had so that meant we either had to use the hand planer we bought or the chisel set. Well, the planer would've been easier but very uniform. I wanted this wood to look like we pulled it from salvage without paying the price they charge for it. The chisel added time but gave the look I wanted. Of course I did it the hard way the first 6 boards by using the chisel with a mallet to help it along but when I noticed how sharp they were, I knew I didn't need to use it which was a relief especially since I'd accidentally clocked my wrist with the mallet two days in a row. I probably used the most tips from
this video to age the wood.
I used the awl to mimic beetle holes, chisel for mimicking axe chops because giving me an axe at this point in the project would've been unwise and also used it to hand whittle the edges of the boards, some square head old timey nails I bought for indentations (which came out okay but nothing spectacular) and the Dremel tool to make splits.
I used 800 grit sandpaper to take off any splintery parts on the distressing but not taking it back too far that it lost the character from the tool. I knew the poly or wax would seal it and it's not like these would be underfoot, just on the wall.
I used the dark walnut water based stain I already had on hand. I couldn't do an oil based stain because I couldn't tolerate the amount of stink. Every woodworking site I checked with talked about the importance of using pre-stain wood conditioner and I know how crappy and blotchy wood can look, especially pine, without it. I put some on and gave it 25 minutes to soak in and then I was ready to stain. I loved the way it looked. I did about 8 boards and thought I was good to go so I polyed those after one coat.

Then as time went on it looked like an orange hue. I was NOT happy as I loathe orange pine. This isn't a 70's cabin look I was going for. I took a board to the bedroom and it was confirmed, orange. I grabbed the dark wax I had on hand to darken it and it seemed to be doing the trick. Then the more that soaked in, all it really did was turn it a deeper orange. I could tell the Mr was not happy because he thought based on my initial reaction we were in the home stretch. A little research showed that apparently staining pine brings out the orange in it. Of course it does. I did as much research as I could to find solutions to try on parts I knew would get cut off. I found an article about how to de-orange wood using white chalk paint dry brushing (which I had) and dark wax. Nope. I tried some of the Barnwood stain I got from Retique It initially and it didn't really do anything. Finally, I grabbed some black walnut from Retique It that was sent in error and for some reason I kept it. Welp, that is what toned down the orange color. So back at it and stained it all, let it dry then waxed them because polying was no longer an option due to weather as it was raining and then a nose dive temp wise. It really only added a day and a half to the timeline but at this point I was so used to everything going wrong that it was par for the course.
After letting the wax harden for a day so it was able to at least be handled (2 weeks to cure), we got to it.
The wall was prepped beforehand which consisted of painting it dark brown, attaching furring strips into studs across the wall so that when the wood was screwed in the weight would be evenly distributed across studs. We also knew we were getting brackets that came down for a full wall shelf that we wanted on studs so we used construction adhesive to put vertical 4 inch furring strips for the lag screws to go into.
On a walk, the Mr casually mentioned about putting foam soundproofing panels between the furring strips to block out the heinous witch that has lived next to us for over 20 years. I jumped all over that because it was going to fit and any bit to block out her existence was fine with me.

The biggest math problem that needed solved was how to cut the first and last boards so you don't end up with a tiny little 1-2" piece at the end that'll look like poop just like we had to figure out with the flooring before we started. The Mr found
this thread that spelled things out perfectly for him. We both agreed we would have him cut the first board to start but wait until we got to the end to more accurately cut the board because we know our house is far from square. Because these boards would also act as the baseboard for that wall, the Mr had to measure each board for the top of the furring strip to keep it even. Most of them were 59 1/2" but there were some that were different by a fraction up or down.
I would jam the 12" panels behind the wood as it was put up by using composite shims to shimmy them into place. It worked better if I waited to open them out of the vacuum sealed pack right before I needed them so they would expand in place. Otherwise much more coercing was needed which wasn't bad but still. We used construction adhesive on the furring strips and a cordless finishing nailer which holds more weight to nail into the furring strips for each board.

It sounds easy but it took about five hours to get a 12' wall done. As usual, the biggest pucker butt moment (for me at least) was when it came to the outlet. We had a phone jack outlet that we were covering over so thankfully we didn't have to worry about cutting two spots there. (We put some foam board at the front of the cavity, used an outlet insulator on the blank cover plate and screwed it in.) Knowing our track record with the measure technique, we used
the technique we used for the board and batten wall of globbing up some
putty squares on the corner of the outlet, putting paint on the ends and leaned the board with proper gaps in place hoping it transferred to the back of the board. By the grace of God, it did and the Mr was able to cut inside of those spots and they worked. That enabled him to make marks on the other board and cut about 1/4" out. Of course that last board he had to rip was a pain in the butt for him as the top was 1/2" longer than the bottom so it was a matter of finding the right angle by including the gap so it wasn't tight against the wall. Thankfully he got it and we were so happy with the wood part being done.
If only that was it.
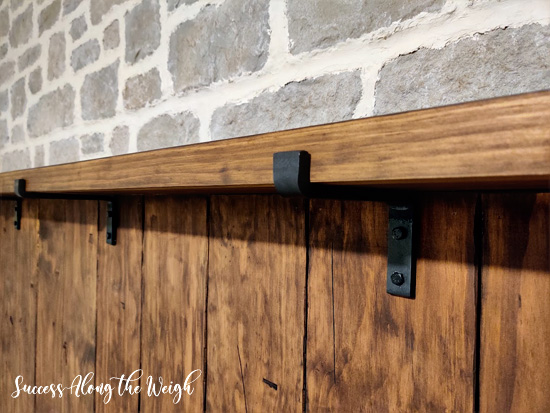
Now it was time to make the shelf that would go completely across the length of the wall. Technically they make 12' boards but we couldn't fit that in our SUV and a quick search showed a joining technique we could use that would work. Here's what we needed for the final part of the accent wall.
Two 1x6x8's
Two 1x2x8's (for a lip on the front so any pics wouldn't slide off and crack us in our sleep)
Fourteen 3" lag bolts (remembering we have the wood, furring strips, 1/4" and 1/2" drywall to go through to get to actual studs)
Wood glue
Brackets with a lip
I stained and waxed the boards but man, because of the weather and having limited space to play with those boards ended up twisting and bowing like a beeotch. I knew that was going to happen so when I ordered the brackets, I asked them to drill a hole in the bracket that would hold the wood so we could screw into the shelf knowing the way pine is just a wiener. We forgot to take pics of the joining process but just look up dowel jig on You Tube and you can find videos on it. Here's what the shelf looked like during the drying process after the Mr joined them with dowels.

We obviously didn't have a 12' long clamp but we did think to use the
flooring ratchet strap we used when the Mr laid the flooring. Then we put a 10 lb weight on the joint overnight to help it dry as straight as possible. We put the shelf portion in place and as predicted one end was up in the air and wasn't sitting straight despite sitting in place overnight, it was time to screw through the brackets to force it into submission.
Then it was time to install the lip to cover up the side of the shelf. It was cut so it lined up with a bracket so half of it would be covered. We were going to dowel join them but the smaller portion on the right got kind of jammed into place and forcing it out would mean likely ruining the stain on the front and that would've caused me to turn it into kindling. So the Mr brad nailed it into place then we put some wood glue on the front of the shelf and end butting up with the other lip, pushed it to level and nailed it into place.
Oh My Lord!!! We were finally done with that part which took months because of logistics but very satisfying in the end when we were able to take a step back and survey the fruits of our labor.
It was perfect to be able to put up a Christmas village I had my eye on for a year and gives such a cozy vibe.
I cannot thank the Mr enough for putting up with the never ending project or as my bestie referred to it, "The Wall." It was such a long time coming it warranted capitalization. 😆
====================
Follow me on
Bloglovin. Some posts may contain affiliate links that help keep this blog running at no cost to you. See the
Disclaimer page for more info.


I had watched the installation videos plenty of times but until you get right into it you just have no idea how it's going to go. But from the moment I made the first cut it actually went pretty smoothly. I know I made a mistake in one place I would have liked to have been able to take back but thankfully that ended up being covered up with grouting and all that so it worked out in the long run. But even before the grouting I was quite happy with how it all looked right after we got those panels up. The wood challenge was mostly about weight distribution and I feel good about how we handled that with the furring strips. I just love the way it all turned out.
ReplyDeleteIt took so much blood, sweat, and tears, but the end result is outstanding! Such a wonderful room that invites coziness and calmness. Absolutely gorgeous!
ReplyDelete