Blacking out in general is usually considered a bad thing except when you're talking about your blinds. I have always hated "springing forward" because it meant the sun was going to be blazing into the room even earlier. While I can take a nap in a fully lit living room, for some reason I am up for good the second the room begins to lighten up at 5:30-6am. If I'm lucky I might be able to fall asleep hours later but I'm a night owl by genetics and that means I'm getting 4-5 hours of sleep if I'm lucky in the summer. (Six is my usual the rest of the year.) I had blackout curtains and while they did enough to keep the tone of the room darker, they were cheap and the light still showed through the top, sides and cracks of the wood blinds. It was maddening. I had black poster board cut in long strips over the top of the curtain rod to keep it from flooding in more and reflecting off of the ceiling.

I finally decided to invest in a blackout blind from Blinds.com. We bought their light filtering cordless blind for the patio door when we needed privacy due to construction literally on our back door over the winter. We were both pleased with them and they even redid the blind when our own measurements were off at no charge to us. (I think you only get three of those before they call it a day and charge you.) So they were the first place I thought of. I looked up and found the same style of blind but in a blackout version. I read
this article on their site about blackout blind light gaps on the side before I purchased them so I knew to expect that I was still going to have this issue even with custom blinds. They mentioned something about Light Blockers that were something you could order with the roller blinds but they didn't offer it with the cellular. I looked on Amazon and they sell the
same thing there. They didn't get as raving reviews as I'd hoped for at almost $40 for a set. Many people said while they did work, they were severely overpriced and you could jerry rig something yourself for much less. Well, jerry rigging is my love language so I got to searching.
 |
| The size I got was 33 Ft x 1/8" x 2" |
I scored the adhesive backing on the back in the middle with scissors for the length I'd need. I would butt it up against the edge of the blind so as not to interfere with the operation of it when I wanted to raise it up for light or cleaning the windows. (I'm sorry, I barely typed the cleaning the windows part with a straight face. There are probably spores from 1998 on the sill. Oh wait, we had them in replaced in 2018, so scratch that...pre-pandemic spores are on there.)
As you can see, since I did this on my duvet you don't have to (or want to) press hard. You just want to score the backing, not the foam. Then peel the scored backing like so:
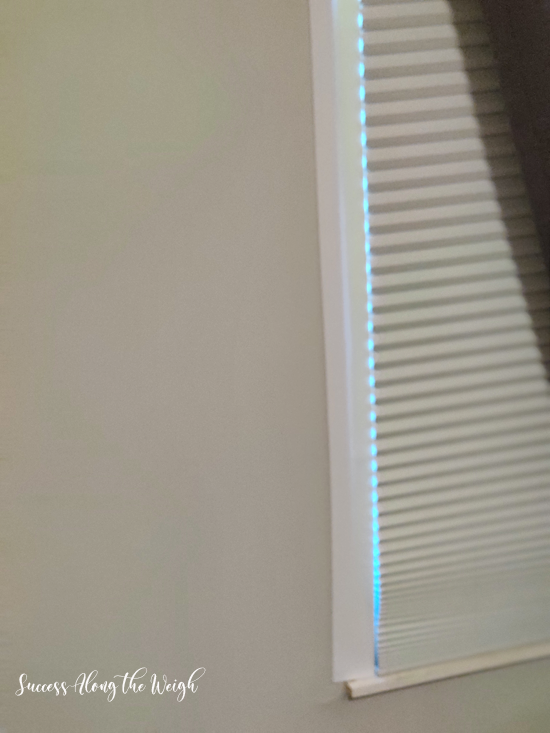
I butted the adhesive covered strip side up to the blind to make the gap as completely covered as possible then pressed the peeled adhesive side against the wall.
Because I keep it closed 99.8% of the time, I just gently pushed the blind back so the honeycomb parts that are sticking past the foam in the pic are now tucked behind it. As you can see the yellowish portion against the blind is the adhesive backing. This provides a light filtering effect which is what I was going for. If you want total blackout, grab some black poster board for a buck or two and cut the strips an inch wide and use
double sided tape to stick it to the adhesive backing that will be directly against your blind. That will get you as close to complete darkness as you can get on the cheap.
 |
| (Ugh, crappy pic. Sorry. But you get the idea. This was before I tucked the blind behind the foam.) |
Here it is the next morning.
In case you don't want to scroll for comparison:
(Actually the right pic was taken an hour later than the original pic so it had even more sun beating down and reflecting up off of my car.) This is with the backing peeled only for light filtering and if my a-hole neighbor across the street would stop revving his hooptie for no less than 10 minutes at 6:30am now, I could tell you if it actually helps me stay asleep in the wee hours. It's like he knew what I was doing and why. Anyway, it's the difference between hissing at the window in the morning or feeling like maybe it's a rainy day that I want to stay curled up in bed for.
If the foam ever needs moved for any reason, a quick hit with a hot
blow dryer loosen up the strip, then a
gentle peel back and a swipe of
Goo Gone to remove any residue from the wall and done. (If you're worried about it pulling paint off the wall and trust me,
it will if you've pushed down too hard and don't use a blow dryer on hot to remove then I wouldn't suggest trying this. No one wants to re-paint! If you decide to put them up anyway, you're doing so knowing if they ever have to be removed that there is a possibility of paint removal. OR if you don't mind wee lil pinpricks at the top and bottom of your windows, you can always just use these
flat clear thumbtacks and not peel back the adhesive at all That's actually what I did after having to remove them to paint that wall because I was lazy by the time it was time for them to go back up. So there ya go.
Is it the prettiest solution you've ever seen? No. But who the hell is going to see that anyway especially if you have curtains up! This is the only solution available to me because of the trim that the window dudes needed to put in so I didn't have the option of the
gap blockers you buy (which also use adhesive) ready to roll because they wouldn't have fit my window.
If the amount of sunlight still coming in the morning or midday is enough to still bother you then you either need to do the black poster board trick I mentioned, get a
sleep mask or just paint the window with black paint
Jerry Dandridge style, ya damn vampire. 🧛
For the rest of us who just need a quick, cheap solution to an irritating issue with blackout blinds, this should do the trick! The best part? Given the amount I used, this only cost me $5!!!
Do you have blackout blinds? Have they improved your sleep?
====================
Follow me on
Bloglovin. Some posts may contain affiliate links that help keep this blog running at no cost to you. See the
Disclaimer page for more info.


Awesome! I love it when we can make our daily lives better with a little effort! I'm lucky my bedroom window is on the north side of the house. My bestie made my curtains and its pretty dark in my room.
ReplyDeleteI'm one that wakes up by 530/600 no matter what time I go to bed.
Fortunately I am blessed by only needing 5-6 hours(aka OLD)
I do need something better for my guestroom as I have had complaints about the sun beating in there. Also have found where people have mcgyvered things to block the light lol. Then again,guests should get up early like me so we can hang lol.
Have a great week!
We'll, if you want more visitors these are the blackout blinds I got and they're on sale right now! 😁
Deletehttps://www.blinds.com/p/blindscom-premium-blackout-cellular-shades/530121
We do use blackout curtains in the bedroom and they work well. I wear an eye mask as well to block out all light because I can't sleep if I see the night light in the hallway, or even the light on the DVR when the tv is on. So between the two I do pretty well.
ReplyDelete