As promised, here are a few tutorials from the
Mr's birthday party. You could EASILY adapt these to a Halloween party, football gathering or just alter colors to fit in any time of year! Today's post will cover Apple Cider Mason Jars, DIY Beverage Tubs and "Reserved" Signs for the person of honor.
Let's start with these...
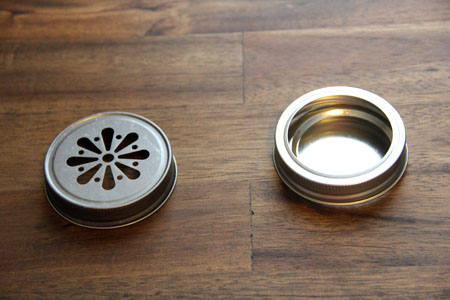
If you've visited any blog or been poking around on Pinterest, I'm sure you've seen those little die cut lids on mason jars for various projects. I desperately wanted to use these for apple cider glasses but make them myself because I'm
crafty cheap like that. I found some lids on Etsy and just made the rest look sassy on my own. I went to a discount store and picked up a box of pint canning jars for $8 and then got to it.
You'll need canning jars, the fancy pants die cut lids if you want them, paper straws, 2 kinds of printed scrapbooking paper and one sheet of plain light colored paper (I used a textured paper for interest), 2 paper punches (mine are 1 1/2" and the other is 3"), hole punch and what you want to tie the tag on with. (Pictured are twines and raffia)
1. With the large hole punch, punch out the patterned paper.
2. If you got 12x12 paper, trace a piece of 8x11 on the back and cut it so what you want the tag to say will go through the printer. Decide what you want your tag to say. Mine says ______'s Apple Cider so that people could fill in their names and keep track of their cider and refill it if they wanted.
3. Flipping the smaller hole punch over, center the punch over the lettering.
4. Punch it out and repeat. When you need to move down to the next row, cut off the row of empty holes left over and start all over again until you've got your tags made.
5. Line up your tag on top of the larger patterned punch.
6. Grab your glue stick (or double sided tape...I used both) and tape/paste it down.
7. Punch a hole in the center of the tag making sure you go through both paper punched tags.
8. Select what you want to tie it to the jar; I used raffia for this one.
Choose which lid you'd like to use. If you can find the die cuts, go for it but if you have the regular ones they'll look just as good. Screw 'em on the top of the jar.
You can always use whatever medium you want to create different looks for your cider jars.
When the party is over you can tell everyone that they can keep their mason jars as favors and use them as candles in their home or luminaries.
I used little pebbles on the left and black barley on the right so it can even have a somewhat manly look for the dudes. You could easily fill these with cranberries or red and green beads or something like that to spruce 'em up for the holidays. The possibilities are endless!
Next project...
When I was looking for drink/beverage tubs, I immediately saw how expensive they could get. For $20, you could get an acrylic small tub that would hold 6-9 bottles and anything larger was obviously more expensive. For the size I had? Easily $70+ plus another $20 for the cider tin! I much prefer the $33 I spent!
I got that thar galvanized...whatever that is. It was near galvanized trash cans so I assume it has something to do with those. I grabbed some hammered brown spray paint and in light coats I sprayed the whole thing.
FYI: Do NOT spray paint the inside like I did if you're going to put ice in there because the paint will chip off once it turns to water. Something in me knew this yet ignored it but no one ever saw it.
I printed out the letters on the textured paper, hole punched and strung them with jute twine and secured the string with a little tape so it wouldn't slide off.
I repeated the process for the big tub paint wise but I left the inside the galvanized material.
I got punch happy with the large 3" punch and used solid but textured pieces of paper and printed the letters for DRINKS out on each color paper and punched them out. I hole punched the tops of the letters so they could be strung. I used a piece of jute twine and measured around half of the width of the tub and tied it to the handle on one side.
I strung the letters onto the twine then tied it to the other handle to keep it in place. For a little decorative touch, I added a raffia bow to the handles to cover up the knots where I tied the twine. Voila!
Final project for today...
The Mr had 2 particular drinks he wanted to try but didn't want people to take them. So instead of keeping them off to the side or putting them in the center of a bear trap, I decided to put some "reserved" signs on them. They said "for the birthday boy" so people would know not to touch them but it didn't come off rude.
For this project you'll need your bottle of pop (or beverage of your choice), the tag with the words of your choice punched out and another punch of a contrasting color that is blank, double sided tape, a small hole punch and bakers twine.
Put a few pieces of double sided tape on the back of the printed punched tag. Center it slightly above the contrasting punch and press down. Punch either side trying to get it as even as you can.
Thread the bakers twine through one side and tie the knot in the back. "Fit" the sign by deciding where you want it to hit on the bottle, marking the twine and leaving a little extra so you can tie it behind the tag. Trim off the ends then hang it on the bottle. (I used a little double sided tape to keep it in place on the back of the orange punch but it didn't need it.)
The Mr was guaranteed his grape soda and lemonade!
Make sure you stop back tomorrow and see
the other tutorials I have lined up!
This post was linked up to Young House Love and Lil Luna.
====================
Like this post? Don't miss another one...subscribe via email or RSS feed. Prefer social media? I'm also on
Facebook and
Twitter


You did an awesome job and I'm glad you get to share this with everyone. Thanks again for a wonderful birthday celebration!
ReplyDeleteThose mason jars are really neat. I'm thinking I may get some jars and use that idea at Christmas time when my folks are here. Maybe I can find the kind with handles for hot cider, or rig some kind of heat protectant sheath that looks nice but protects hands.
ReplyDeleteWonderful ideas. I might try a few of these for my 4th of July party next summer! Thanks for sharing!
ReplyDeleteBeautiful! I love the apple cider glasses with the lids and the label for personalizing. Awesome!
ReplyDeleteSo stinkin' cute!!! So creative and pretty. And I love your handwriting too. =o)
ReplyDeleteCool job on everything!
ReplyDeleteThese are all so cute! I love the idea of using the cider jars as luminaries too. At first I thought you had coffee beans in the second one. :)
ReplyDeleteIf you use coffee beans in one of them, the candle will warm them up and make the room smell like coffee. :)
ReplyDeleteI've said it before and I'll say it again. The Mr. is a lucky guy.
ReplyDeleteYou're so crafty! I don't have the patience for these kind of things! Okay, so maybe I did once, but it was our wedding, and I'm never planning on doing that again! Super cute though!
ReplyDeleteCoffee beans and a vanilla tea light would be wonder after use for those adorable mason jars!!!
ReplyDeleteAbsolutely! We used to have BIG ol hurricane lamps with that but they got stale after a month or so and since we're not coffee drinkers, we were too lazy to buy more. I can also attest they make darned cute candy jars too!
DeleteSuper cute! I Love the galvanized container as well. I would LOVE for you to link this up at my Ginger Jamboree Link Party!!
ReplyDelete