
How many times have we watched a home show or gone to open houses in historic neighborhoods and ogled the craftsman details? Those gorgeous window casings and headers are enough to make ya swoon. I researched online and saw so many pins and posts that made me feel like "heck, why not?" I thought the perfect spot to make this happen would be the entrance and garage doors.

You can see, it's not bad but doesn't exactly wow you either. So here's what you'll need if you want a traditional from scratch header that you can make to, as a friend put it, "put a hat on the door."
1x2's (you'll find it in the lumber section aka furring strips)
1x6's or 1x4's depending on how high you want to go (I used 1x6)
1 1/2" wood screws (affiliate link)
Wood glue (This is seriously the best stuff ever) (affiliate link)
Measuring tape
Speed Square (in the shape of a triangle...wth?) (affiliate link)
Pencil
Miter saw (or small hand saw if you please)
220 grit sandpaper
Brad Nailer or small finishing nails
Screwdriver
Paint or stain
Wood filler (affiliate link)
Caulk
To quote Tone Loc..."let's do it."
1. Measure the top of your door (or window) trim and mark your 1x6 or 1x4.
2. Mark 1" more on your 1x2 if you want your top trim to be more traditional so it comes out by 1/2" on each side. If you're in a tight space, just mark the same measurement.

3. Grab your safety glasses and head out to the miter saw. Line up your laser with your pencil mark and cut your 1x4/6.
4. Do the same with your 1x2.
Make sure you sand the entire piece of wood especially the ends you just cut as they have a tendency to splinter when cut. You want nice, smooth edges or else it's gonna show under the paint/stain.
Now it's time to assemble.
5. Run a small bead of wood glue along the back of the 1x2 (the part that is 2".)
6. Put your 1x4/6 on the glue strip of the 1x2 as a "topper."

7. Wipe any excess glue from the back.
8. Use the 1x2 on top and bottom of the header. Assemble a few of them in batches.
Allow the glue to dry for at least 90 minutes.
9. Time to grab the 1 1/2" wood screws!
10. You can see that these will easily go through your 1x2 and well into the 1x4/6 to make a solid header.

11. Match up your screw to the drill bit that is one size smaller. If you select the same size, the screw will have nothing to grip to.
12. Drill a pilot hole and secure each end.
Now we're cooking with gas! (Said the frontier lady)
13. Now it's time to fill in any gaps you may have between the two pieces of wood so they will look smooth when painted.
14. In addition to making sure I sand the ends, sometimes you just have those rough wood cavities of the cut end so I fill those with the wood filler and use a drop of water to smooth the finish.

15. Sand any spots you used the filler.
16. Then it's time to prime/paint!
When I was done applying my coats of paint, it looked so purty! I was ready to hang it.

Then I had one of those sinking feelings and I had the Mr hold it up to its new home.

I hated it!
I mean I loved the header but I went against my judgment in the store to use the 1x4 and it was just too massive for our space. It would look awesome in a regular house but in a squished entry like that? Nope.
Balls.
So it was begrudgingly back to the plan I had for quite some time. I've always wanted to do them and we've had some leftover baseboards from our flooring project 3 years ago just hanging out in the garage. I unscrewed the wood screws, grabbed my utility knife and scored off the wood glue and carefully pried off the 1x2's with my crowbar so I could reuse them.
I basically repeated the same steps but put a 3 1/2" stacked appearance baseboard in place of the 1x6.

Since a test screw showed that the 1 1/2" wood screws were going to be too big and crack the baseboard, I used the brad nailer to pop a few in to stabilize it.

Then it was time to repeat the process with the wood filler and paint. Didn't I just do this??
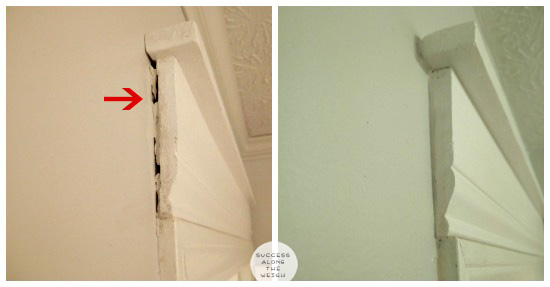
While we absolutely LOVED the way it looked, as you can see when it was held up that the bright new white paint made our trim and door look quite dingeworthy.
 |
| (Trust me, it looked much worse in person) |
Well, shizzballs.
So I busted out the painter's tape and taped off the hinges and doorknobs, put on the disco channel and got to it. As you can see in the second picture, painting the trim and door made all the difference in comparison.

You can see putting the header on makes a nice statement in comparison to just the plain old builder grade oak trim from the 90's.

I happily hung the other and my heart skipped a beat.
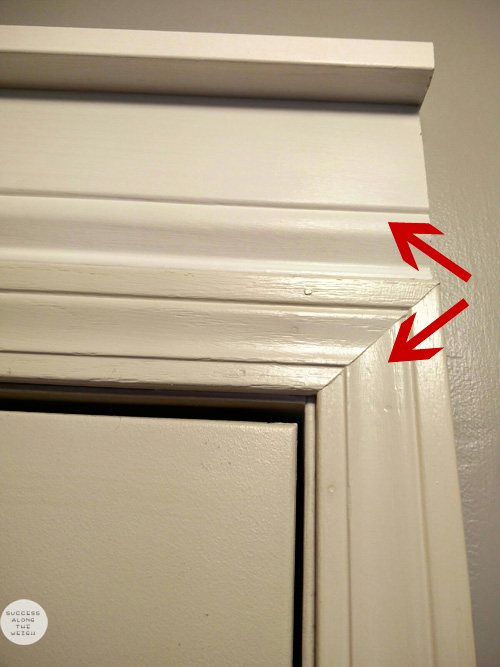
But hanging them isn't the last step. As you can see on the left side because of the gap the molding has compared to the 1x6, I had to put in some wood filler to build something for the caulk to grab on to.
 |
| (Two different doors but you get the idea) |
Then once that dried, I used a white caulk to smooth over that and give it a finished look on the right.
I loved it so much I made 12 more so now every doorway in our home has a header inside and out. It really gives such a beautiful architectural touch and I only wish I'd done it sooner! Total cost for all 12 headers was $93. The wow factor if we ever sell this place will make it look like we spent WAY more and we're confident has added a ton of value!
Do you have headers in your home? Do you think you'd take on this project?
(This post contains affiliate links and should you buy through them, I may receive a small commission for blog expenses at no additional cost to you. Thanks for your support!)
====================
Like this post? Don't miss another one...subscribe via email or RSS feed. (Or you can follow me on Facebook )
I love them, awesome work!
ReplyDeleteThis was all you and I'm proud! They look great and really do add a lot of value to the place without actually costing too much at all. Great job!
ReplyDeleteVery interesting. And you were right to not like the first one and try again.
ReplyDeleteSecond one is marvelous. And very good you finished off the whole house. There is something to be said for multiples at the same time. Once you figure it out and know how to do it, crank out the rest right away while the supplies are out and you remember how to do it.
All our trim is actually 1x4's in the whole house. Baseboards, all the way around every door and window. And built in display quilt racks in one hall.
It took a lot of time. (Not my time, three Amish guys finished the inside of our house when we built. Lots of built ins, lots of detail.) A heck of a lot of 1x4's. But it is great.
I absolutely love these! They make the ceilings look so tall and frame the doorways so nicely. You did an AWESOME job momma!!!!
ReplyDelete